Recording teaching materials
Guides on recording and uploading lectures using Panopto, Zoom and other tools.
Panopto recordings
Panopto is a video learning platform that is integrated with Canvas.
Upload video to Panopto
Upload video recordings to Panopto and embed them into Canvas.
Recordings made in lecture theatres
Tips for lecture theatre (and other teaching space) recordings and Zoom-enabled rooms.
Zoom recordings
Getting started with Zoom recordings and embedding them into Canvas.
Panopto or Zoom
Which should you use for teaching online?
Types of recordings
Reusing past lecture recordings
If you wish to reuse recordings from previous teaching term then copy the recordings to the new course folder to ensure students will be able to view the videos. Alternatively, update the sharing settings in the old course folder to “(Unlisted) Anyone at your org who has the link” and share the video links to the students (e.g., in Modules).
Panopto recordings are automatically archived 13 months after their last view. They can be restored in Panopto by anyone who has access to the video in the course. Restoring an archived video can take up to 48 hours to process in Panopto.
Panopto recordings are permanently deleted after 2 years since last view. If recordings are reused (and actively viewed) they will not be automatically archived or deleted.
Video and audio recordings in Canvas
Recording video or audio can be achieved directly from Canvas’ page editor using a webcam-enabled laptop or PC, or a camera and microphone attached to your PC/laptop. Canvas’ Page Editor also enables you to upload pre-recorded videos. The recording has 500MB size limit.
Screen capture for Windows and Apple devices
Panopto (Windows and Mac)
- Panopto allows you to record screencasts right from within your browser. You are able to trim sections from your video and it provides auto-captioning for accessibility. Its integration with Canvas makes it easy to share videos with the class.
Zoom (Windows and Mac)
- Another relatively simple way to record your screen is with Zoom. Please review the guides for Zoom, in particular, the instructions for recording with Zoom and screen sharing in Zoom.
Windows
- A tool that offers more post editing options for screen-capture video is BB Flashback Pro. you can record and edit your screen, enhance the video with sound clips, add text and images, and publish in multiple formats. This software is available to install via the Software Centre (only available on University issued devices and requires VPN access).
- BB Flashback Express is free to download and like the pro version, can record the screen, capture webcam, add commentary with no time limits or watermarks. However, unlike the Pro version, it does not include the editing suite or the ability to add text, images or sounds.
Apple devices
- Mac computer: QuickTime Player has a screen-recording feature.
- iPhone and iPad: In iOS 11 or later, and iPadOS, you can create a screen recording and capture sound on your iPhone and iPad.
Record using mobile devices (phone or tablet)
- View the guides on filming with a mobile device and creating video assignments.
- Or set up your smartphone as a document camera.
- To avoid using up your Canvas file quota (5GB), we recommend that staff upload recordings to Panopto.
Webcams are available to borrow from the Learning Environment Support Unit. Phone +64 9 923 4800, internal (ext. 84800). For other recording requirements e.g., tripod, camera or laptop, contact your faculty delegate.
One button studio
The One Button Studio is a self-service facility designed to allow staff to produce video recordings.
The process is as simple as selecting which feature you want: Camera, Lightboard or PowerPoint (inserting external content) and after entering in a few details into a lectern computer and pushing record, it’s ready to go. Once the lecture is finished, the One Button System will email the recording to the users’ email address.
This specialised equipment has been installed in the Barry Spicer Media Studio on Level 0 of the Business School, in room 260-006A and is a bookable space in the Room Booking System (see the screenshot below to select the room).
Bookings must be received and confirmed before 12pm the day before you want to go to the studio. Please do not block out the studio for lengthy periods – it will be in high demand.
Filter by the Room Booking system by choosing:
- Minimum capacity 1
- City Campus – Sector 200
- Lecture Theatre Recording
- Select your preferred date and time, click next.
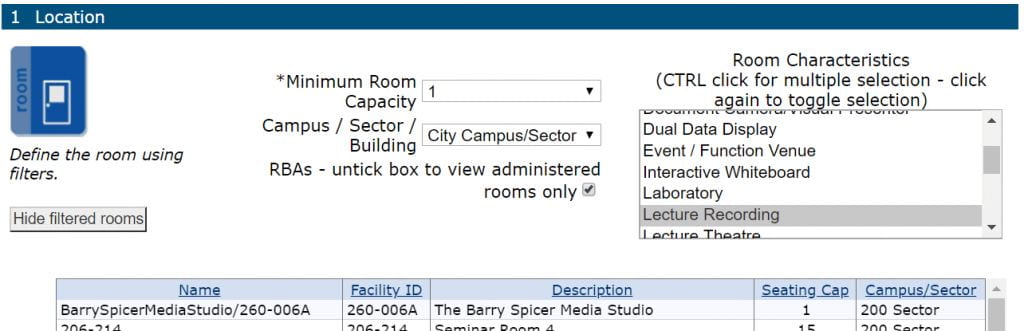
- Tick the box next to the Barry Spicer Media Studio to book. If the room us unavailable at your selected time, click the stopwatch icon to show available times. You can also view the timetable for the room via the calendar icon.

Record narration in PowerPoint
Use Panopto to record your PowerPoint presentation. Panopto includes auto-generated captioning for accessibility.
- From your Canvas course, navigate to the Panopto page and click Open in Panopto icon; this gives you more screen ‘real estate’ to work with.
- Next, follow this instructional video to record your PowerPoint presentation. Decide whether to use your camera while presenting, or just record a voice-over.
- If PowerPoint is not installed on your computer, consider using PowerPoint Online. Log in with your University of Auckland Microsoft account, e.g. jblo001@uoa.auckland.ac.nz, then click the PowerPoint icon.
Note: You do not need to turn on auto-captioning in PowerPoint because Panopto will create captions automatically.
See also
- Viewing presenter notes while recording PowerPoint
- Recommended Zoom settings for recording PowerPoint
- Embed the video into Canvas (Announcements, Assignments, Pages etc.)
Tips for recording video
If you opt to develop podcasts, videos of yourself speaking to camera, or narrated recordings of your slides, consider breaking them down into short chunks. Recording a two-hour lecture in one go is not hugely satisfying and it increases the chance of technical issues, whereas breaking the material up will help you think about reducing quantity overall. Students will also benefit as they can focus their study on specific aspects of the course.
Remember to:
- Make videos accessible to all students – provide transcripts and/or subtitles for self-created videos and lecture capture recordings (Panopto does this for you). A summary of what was covered will be helpful for students.
- Use plain English – avoid colloquialisms, jargon, acronyms.
- Chunk contents into a short, manageable sizes. Consider a series of short videos that cover key concepts.
- Use a script to help you communicate clearly, slowly and to the point.
- Slow down your speech, enunciate, speak clearly and position the microphone near your mouth.
- Consider the environment you are recording from – external noise and that photo of your family in the background will be captured in your recording.
- If you are unfamiliar with using the software or equipment, we recommended that you test before you record to minimise the risk of having to re-record. It might also be good to record yourself and see how you look to the viewer.
Watch-party lectures
A watch-party introduces the concept of delivering asynchronous material synchronously. It is where you schedule a time for you and your students to be present online to watch a pre-recorded lecture. Students can ask questions in a chat window and you can answer them immediately.
Find out more about watch-party lectures.
Additional guides
Provide a transcript for accessibility
Closed captioning for recordings
If you use Panopto with your Canvas course, Panopto will add captions to recordings automatically. And if you integrate Zoom with Panopto and record to the Zoom Cloud, the recording will upload to Panopto and captions will be applied.
Live captioning
- In Zoom, enable on-the-fly captions for a live lecture stream (live transcript feature). See the Zoom recordings section for details.
- In Panopto, on-the-fly captioning of a live lecture stream (Panopto webcast) is not available.
- Students may also benefit from Google’s Live Caption feature. Captions are provided in Google Chrome browser whenever they play a video (English only).
Transcript using Microsoft Word Online
Microsoft Word Online* allows you to upload your MP4 recording via the ‘Transcribe’ feature. You will be able to transcribe up to 300 minutes of video per month.
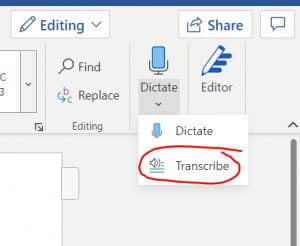
- View the instructions from Microsoft to transcribe your recordings (scroll down to the heading called ‘Upload an audio file’). The transcript will label each paragraph with a placeholder name of who’s speaking, e.g. ‘Speaker 1’. If you don’t require labels (e.g. there is only one voice on the video), follow the steps that describe how delete them by means of the ‘relabel’ feature.
- Click Add all to document then download a PDF copy. In Word Online, click File > Save As > Download as PDF.
- Upload the document to your Canvas course via the Upload Document function, then insert a link to your document next to the video.
* log in to Word Online using your University of Auckland Microsoft account, e.g. jblo001@uoa.auckland.ac.nz, then click the Word icon.
What about errors in automated-captions?
Understandably, some teachers are nervous about auto-captioning due to the likelihood of transcription errors. However, the University is committed to providing accessible resources for the benefit of all students, not just hearing impaired or neuro diverse students, or English as a second language students. And viewing captions, along with listening, can often help learners retain information (CAST, 2018). So captions that contain errors can be more of a help than a hindrance.
That said, some courses are not suited to auto-generated captions, e.g., language courses or dialogue that contains a significant amount of te reo.
Where auto-captioning is provided, teachers are required to post a disclaimer, e.g., in the course information page, or where the recording appears in their course content:
Note: Automatic captions, where used in live or recorded lectures, are generated by computer algorithms and are subject to error. Misrepresentations of the spoken content may occur due to mispronunciations, accents, dialects or background noise.
Should you wish to manually correct transcription errors—this is not a requirement of the University—follow the steps to edit closed captions in Panopto.
References
Video editing
Recordings from the lecture capture system will be released to students – via the Panopto Video menu in your canvas course – 24 hours after the lecture. If you need to make edits to the recording, you should do so within this time frame.
These editing apps allow for basic editing features such as, trimming and splitting.
- Panopto’s editing features include trimming sections of your video and splicing in secondary video clips, PDF slides, webpages or YouTube clips. See the guides on the Panopto support site for advanced editing.
- If you want to get creative and manipulate a video or post-produce a series of video clips, consider the built-in Windows 10 Video Editor, or Apple Mac alternatives like QuickTime Player or iMovie for iPhone or iPad.
Note: Although Zoom Cloud recordings allows you to set the IN and OUT points of your recording, this only takes effect if you share the video from the Zoom platform. However, we do not recommended sharing Zoom Cloud recordings with students because they expire after 60 days. A better solution is to integrate Zoom with Panopto so the recordings are uploaded to Panopto automatically. You can then edit the video using Panopto
Upload video to Panopto
To avoid using up your Canvas file quota (5GB), we recommend that you upload your video to Panopto.
Reduce the file size of your video
If you create your recordings in Panopto, the file size is not so much an issue—Panopto will determine a student’s broadband speed and downscale the video playback if necessary. Therefore, these instructions are mainly for compressing super large files prior to uploading them.
Instead of creating one long recording, consider structuring the content into shorter, focused videos. This helps avoid large file sizes and students will appreciate the information being in ‘bite-sized’ pieces. However, if you have a video that you intend to upload to Panopto, and its file size is, say, larger than 1GB, compress the video so that it will successfully upload.
Compress your video using VLC Media Player
VLC Media Player can compress the video’s quality or scale. If you are using a University PC/laptop, VLC is available via the Software Centre or Self Service on Mac (only available on University issued devices and requires VPN access), or if you are using your own computer, download it from the VideoLAN website.
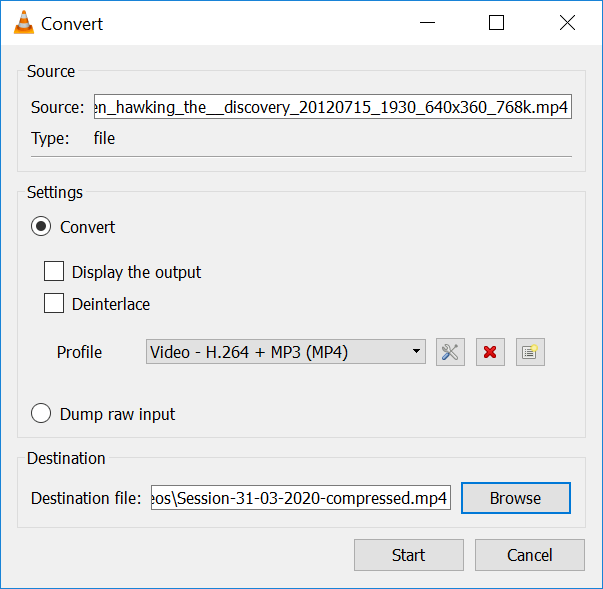
- Open VLC Media Player.
- Click Media > Convert / Save.
- Select the video file via the Add button.
- Click Convert / Save.
- Select Video – H.264 +MP3 (MP4) as the profile.
- Click Browse to select a folder on your computer where the file will be saved to.
- Enter a file name and click Save.
- Click Start and wait for the progress bar on VLC Media Player to finish.
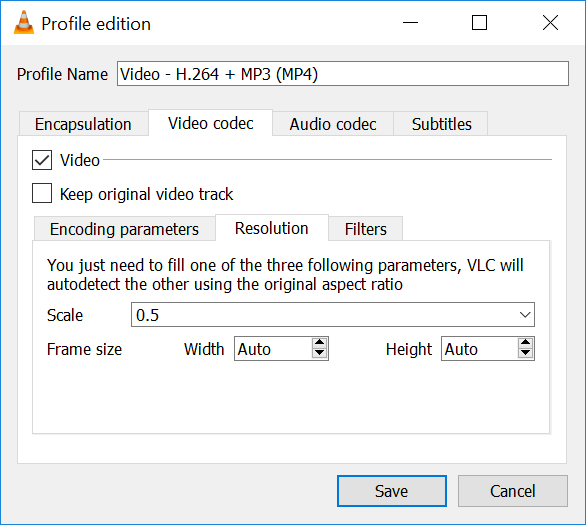
- If the file is still too big, try again but this time, click the tools button next to the Profile.
- Under the Video Codec > Resolution tab, change the Scale to about 0.5.
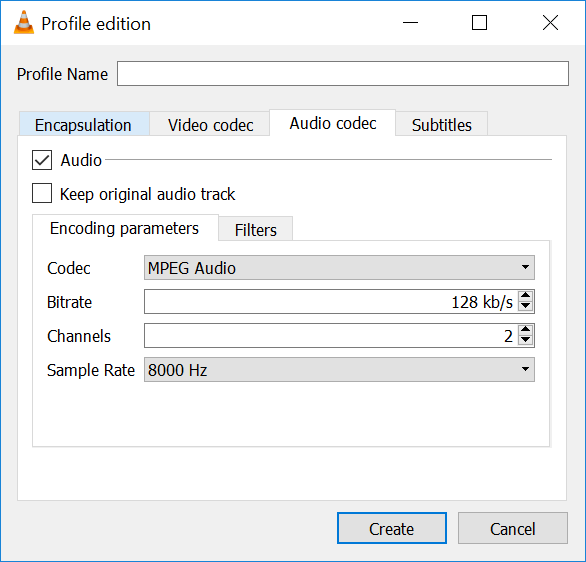
- Under the Audio codec tab, make sure Audio is checked.
Related resources
UoA branded Start/End slides – PPT
University Media Productions team (for directing high-quality, scripted productions).
Page updated 11/04/2024 (new instruction for reusing past recordings)