Streaming live lectures
Streaming live lectures compliments lecture theatre recordings.
Do I need to live-stream lectures?
Zoom enables live streaming as an option for students who are unable to attend lectures in person. Consider live streaming as an additional tool to compliment the recording, which is made available to students 24 hours later and stored in Canvas via the Panopto Video tab.
Consider also that live streaming could be used in non-lecture theatre situations, e.g., tutorials, lab demonstrations etc.
Be mindful that not all students have access to broadband internet, and many have obligations or restrictions that prevent them from attending lectures in person. Therefore, lecture theatre recordings are still required.
Adjust your Zoom settings for streaming live lectures
Before you schedule a live streaming lecture, go ahead and adjust your Zoom settings. You will only need to do this once.
- In your web browser, go to https://auckland.zoom.us/profile/setting
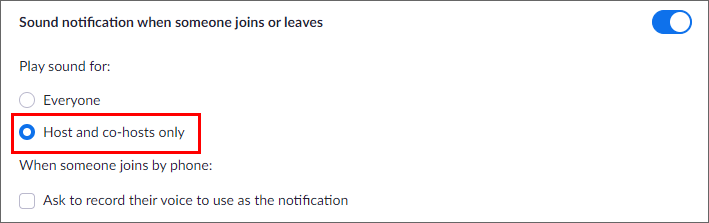
NOTE: Ensure that you are logged in to your University account. You can check this under your profile image at the top-right; it should say LICENSED. - Search or scroll down to Sound notification when someone joins or leaves.
- Change the setting to Host and co-hosts only and click Save.
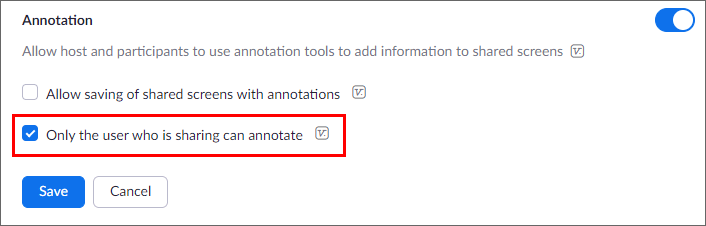
- Scroll down to Annotation.
- Change the setting to Only the user who is sharing can annotate and click Save.
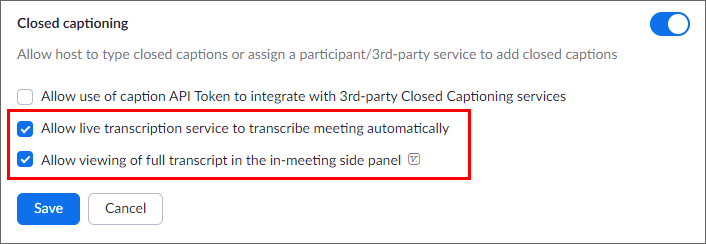
- Scroll down to Closed captioning.
- Select Allow live transcription service to transcribe meeting automatically.
- Select Allow viewing of full transcript in the in-meeting side panel and click Save.
Schedule a live streaming lecture
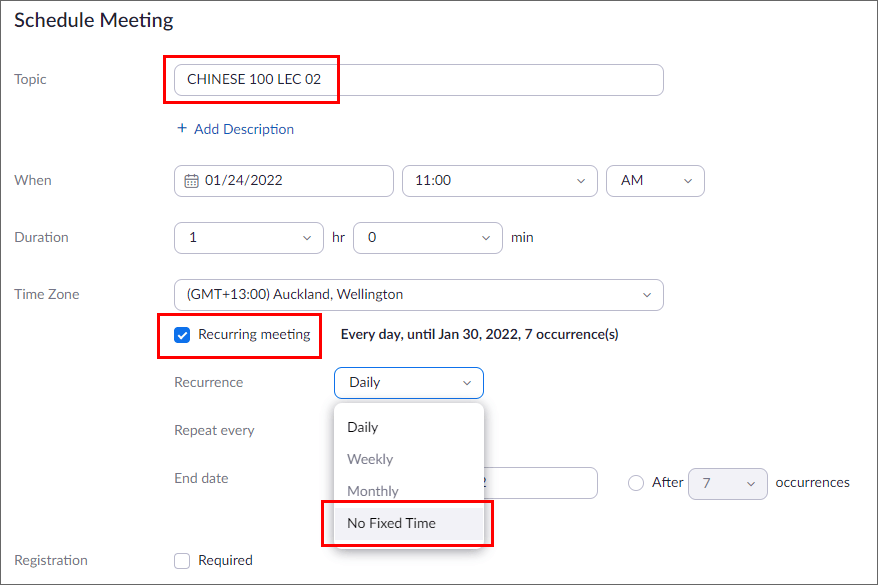
- In your web browser, go to https://auckland.zoom.us/meeting/schedule
- Enter your course name and class into the Topic field, e.g., CHINESE 100
- Select Recurring meeting checkbox.
- Select No Fixed Time from the dropdown menu.
- Ensure Meeting ID is set to Generate Automatically (not Personal Meeting ID).

- Under Security, consider using Require authentication to join, then select University of Auckland from the dropdown menu.*
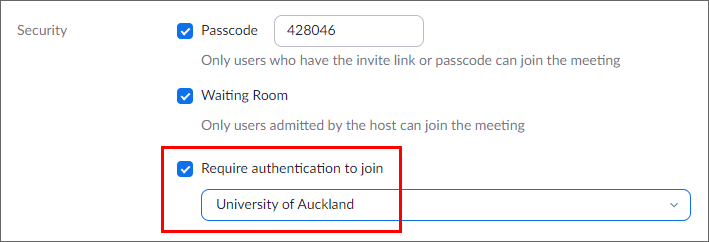
* The Require authentication to join setting is useful for increasing the security of your meeting, requiring students to log in with their University of Auckland account thus preventing uninvited guests ‘Zoom bombing‘ from outside of the organisation. The trade-off is that you should provide clear login instructions (example below). This may not be an issue with small cohorts or stage II or III classes, so please use your discretion.
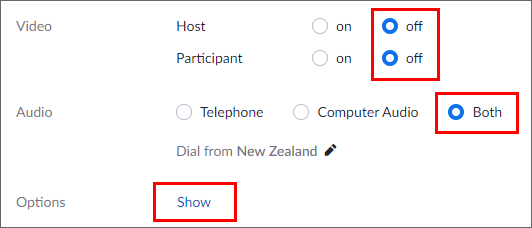
- Video for Hosts should be off for start of meeting.
- Video for Participants should be off.
- Audio set to Both.
- Next to Options click Show to add Alternative Hosts.
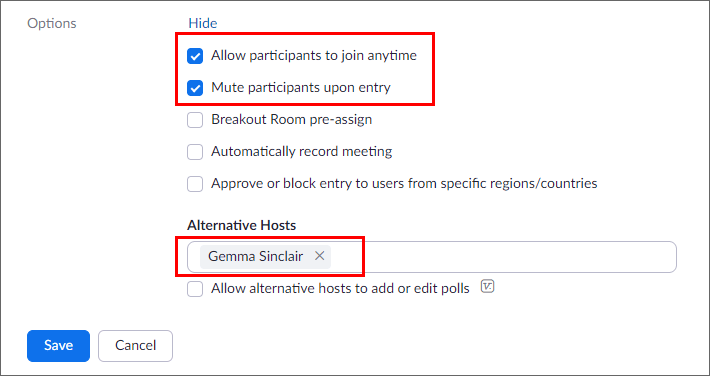
- Select Allow participants to join anytime.
- Select Mute participants upon entry.
- Add other teaching staff in the course as alternative hosts so they can host or moderate the meeting.
Note: Alternative hosts will get an email from Zoom about being added to a Zoom meeting. - Click Save.
Finally, paste the link that Zoom provides into your Canvas Syllabus page or use a Canvas Announcement, e.g.,
Join Zoom Meeting
https://auckland.zoom.us/j/94348750215?pwd=aBCdEfhg
Important! Please include instructions for students to login to Zoom using their University account, otherwise they may complain that they cannot connect to the meeting.
Copy and paste this instruction into your Canvas course:
To join the Zoom meeting you will need to sign in to the Zoom app using your University account:
1. Open the Zoom app
2. If you are not yet signed in, click Sign in with SSO
3. For the Domain, type auckland and click Continue
4. Paste the link to the Zoom meeting into your browser and launch the meeting
Launch the Zoom live stream
Download and print these instructions and take them to your teaching space.
When you are about to present your lecture:
- Open your Canvas course on the lectern PC.
- Click the relevant Zoom link for your lecture that you scheduled in advance.
Prevent interruptions during your lecture
When launching the Zoom link at the start of the lecture, Click the Security icon at the bottom of the Zoom screen.
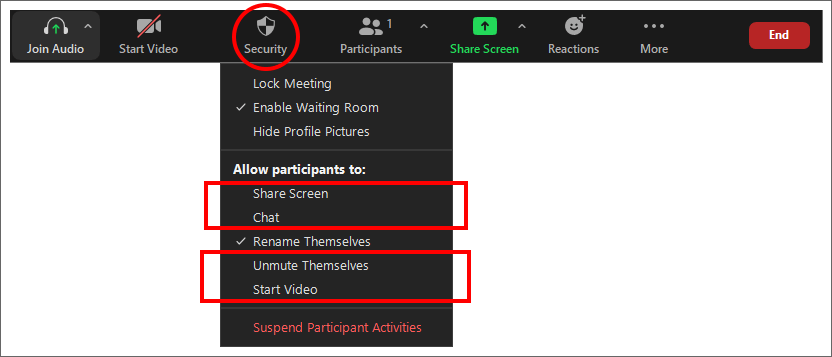
Disable the following options to avoid interruptions from viewers:
- Share Screen
- Chat *
- Unmute Themselves
- Start Video
* If chat is enabled, be clear with students when/if chat questions will be reviewed during the session.
Note: The Zoom meeting does not need to be recorded if you are delivering a scheduled lecture in a recording-enabled room as it will be captured via lecture theatre recording system. For suggestions on when to record the live stream, please see the FAQ below
Frequently asked questions
Students report they are unable to connect to the Zoom meeting
Please review our suggestion on the frequently asked questions page.
Upload video to Panopto
If you are presenting a scheduled lecture in a recording-enabled lecture theatre*, the lecture capture system will record the live stream automatically. The recording will appear in Canvas under the Panopto Video menu and is saved to the course folder in Panopto. You will have 24 hours to edit the recording before it is released to students.
* For suggestions on the use of the lectern equipment and starting an ad-hoc recording for non-scheduled lectures, see our page on lecture theatre recordings.
If you are live-streaming a scheduled lecture from home, yes, please record the live stream. We suggest that you integrate Zoom with Panopto and record to the Zoom Cloud. The recording will upload to your nominated folder in Panopto; we recommend that you choose My Folder as your nominated folder. From there you can edit the recording then move it into the Panopto course folder for students to access.
Is my teaching space set up with Zoom?
The central website lists the rooms with lecture recording and streaming capability.
How do I display the document camera in Zoom?
The document camera needs to be selected in Zoom screen sharing options (advanced tab).
Download and print these instructions and take them to your teaching space.
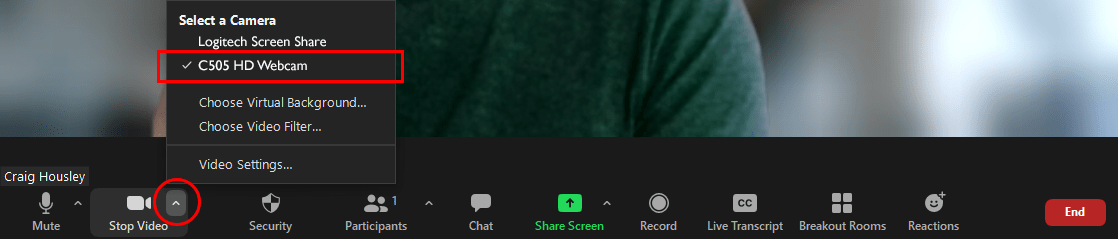
- In Zoom, click the arrow near the camera icon and select the webcam as the primary camera.
Note: This allows you to select the the Logitech Screen Share (Document Camera) as the secondary camera source under Advanced Sharing (the webcam can remain disabled).
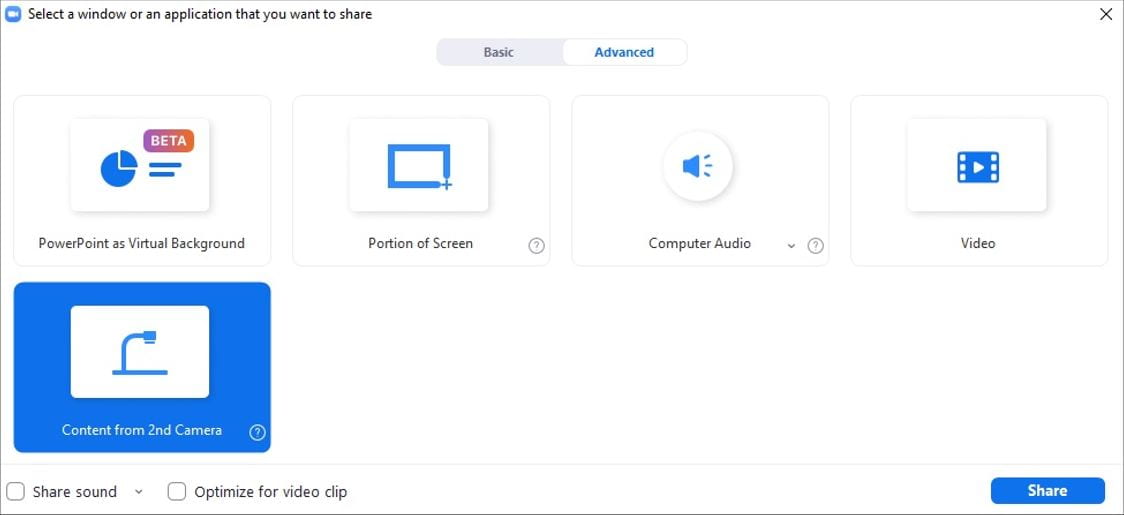
- Open the Share Screen or New Share option in Zoom and click the Advanced sharing tab.
- Choose Content from 2nd Camera and click Share.
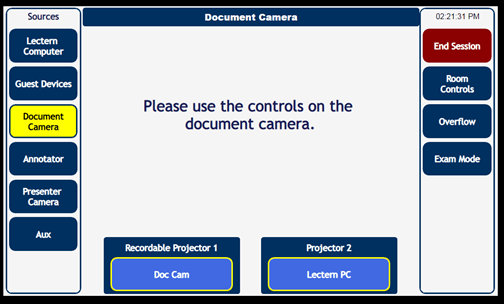
- On the lectern touch panel, project the Document Camera onto the Recordable Projector 1.
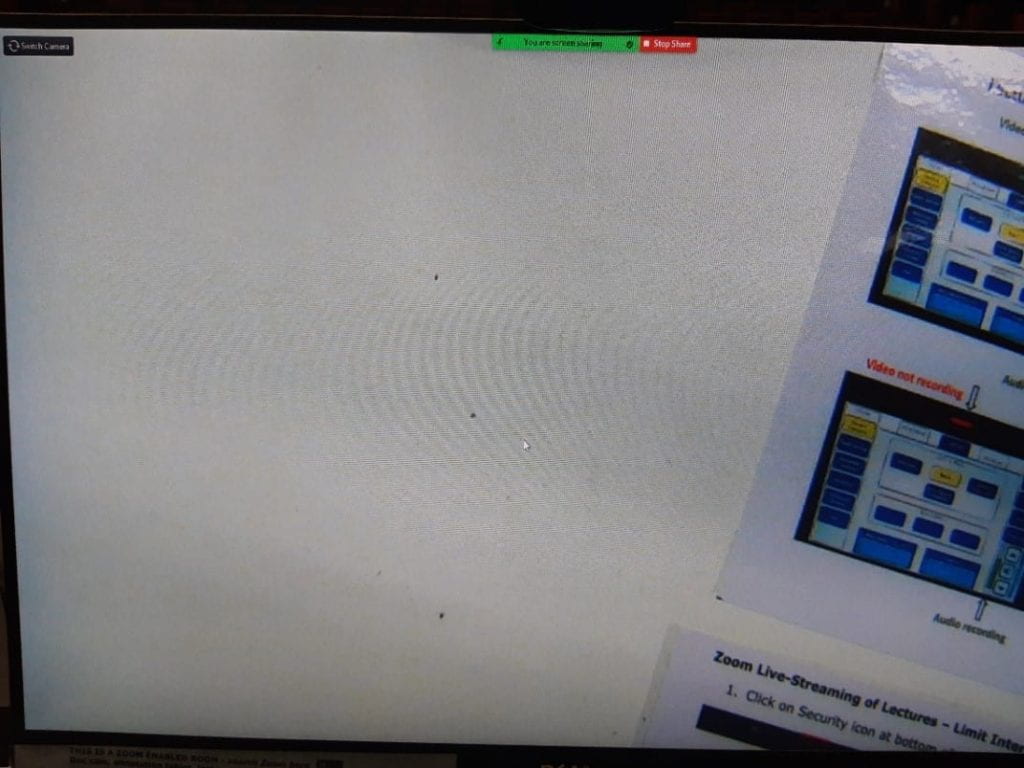
The document camera should now appear through Zoom screen-share.
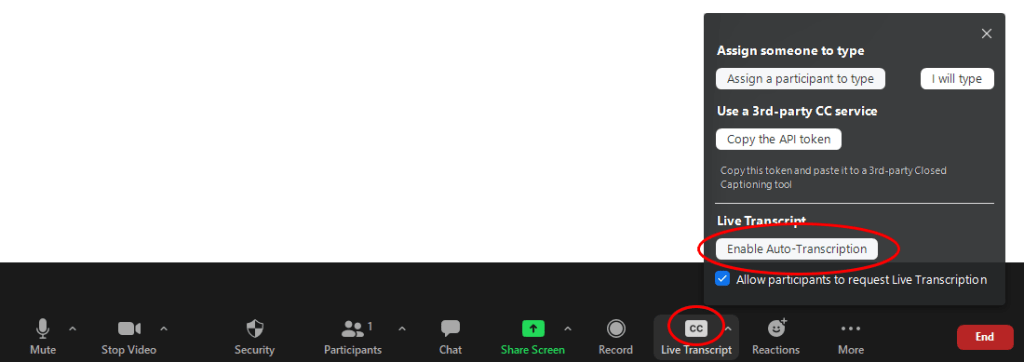
Should I enable live transcript?
The University is committed to providing accessible resources for all students, so the short answer is yes. However, it should be noted that the live transcript (captions) is only available for English and is created via a text to speech engine; undoubtedly some error will occur. Teachers are advised to inform students, either verbally at the start of each session, or by posting a disclaimer in the Canvas course syllabus page.
You may want to copy and paste the following message:
Note: Where automatic captions are used in live lectures via Zoom or Panopto recordings, these are generated by text to speech algorithms, so the quality of the captions may vary. Automatic captions might misrepresent the spoken content due to mispronunciations, accents, dialects, or background noise.
Live transcriptions can be activated via the Live transcript button on the Zoom toolbar.
Finding support
Room equipment
For reporting faults relating to room equipment, see the options for reporting problems on the Staff Intranet or log a ticket for reporting non-urgent faults.
Zoom self-help
For self-directed resources on Zoom, see our guides.
Page updated 03/05/2024 (added finding support)