Zoom
Zoom supports these learning types (see definitions):
Zoom video conferencing can be used for online meetings, virtual office hours, pre-recorded presentations and lecture streaming.
Streaming lectures may not be appropriate in all situations—students may be disadvantaged by bandwidth and connectivity issues, or are studying in different time zones. Small cohorts may be more manageable but check with your students if they are comfortable with live streaming.
Always provide a recording of the presentation to ensure all students have access and for revision purposes.
Meetings
Host Zoom meetings for lectures and tutorials (smaller cohorts work best) and virtual office hours.
All staff have a Zoom Pro license. This enables meetings for up to 300 participants and recording to the Cloud is possible; this has the added benefit of auto-generating transcripts.
Webinars
Webinars are designed for large audiences. Participants cannot see each other which reduces bandwidth but also reduces the sense of ‘learner community.’ Student engagement is limited to the chat window, Q&A feature, and polls.
Webinars are an additional cost to the Zoom license fee, therefore the University recommends webinars ‘as a service’ where needed.
Pre-recorded presentations
Zoom can be used for pre-recorded presentations—join a meeting with just yourself present and record your screen. However, from 2022 the University recommends Panopto for its accessibility features and ease of use with Canvas.
How-to guides
From the University of Auckland
Frequently Asked Questions
UoA Knowledge Base
Cameras on or off?
Suggestions for students
From the makers of Zoom
Using Zoom for teaching
If your students are not disadvantaged by their time zone, nor internet connectivity, live-streaming lectures may be appropriate. However, always provide a recording of the session to mitigate technical issues and for accessibility and decide whether it is appropriate for students to leave their cameras off.
Install Zoom
Zoom is available free from the Zoom download centre and the University’s Software Centre for Windows and Self Service for Mac. It can be used to record a vignette/presentation for which you will need a web-cam enabled laptop or PC.
Zoom Pro licences are enabled for all University of Auckland staff and doctoral students with @auckland.ac.nz email address. Everyone else with an @aucklanduni.ac.nz address (i.e., all other students) only have access to the basic version of Zoom to create their own meetings. Zoom Pro includes up to 300 participants and meeting duration limit of 24 hours (instead of 3 participants and 40 mins on the basic version).
Please make sure you are logged in to Zoom before you start your presentation, otherwise the recording will end automatically after 40 minutes.
Log in to Zoom:
- Go to https://auckland.zoom.us/
- Sign in using your University username and password.
Note: You cannot be logged in on more than one device at a time. Logging in on a second device will log you out of the first one.
Zoom security
Zoom’s security features are designed to prevent ‘Zoom bombing’. This is where an uninvited guest enters a Zoom session, potentially being disruptive by typing inappropriate chat messages, taking over screen sharing, or making inappropriate comments into the microphone.
- Read IT Connect Zoom security guide.
- Watch a video by Tim Page, Senior Technician on Zoom bombing countermeasures.
Consider adjusting your Zoom settings:
- In your web browser, go to https://auckland.zoom.us/profile/setting
NOTE: Ensure that you are logged in to your University account. You can check this under your profile image at the top-right; it should say LICENSED. - Ensure Waiting Room is turned on (guests must be admitted into a meeting by the host). Note: Only participants who haven’t joined Zoom via your whitelisted domain will start off in the Waiting Room. For example, if your whitelisted domain is *.auckland.ac.nz (see below), staff at the UoA will bypass the Waiting Room. This makes the task of managing the Waiting Room less onerous.
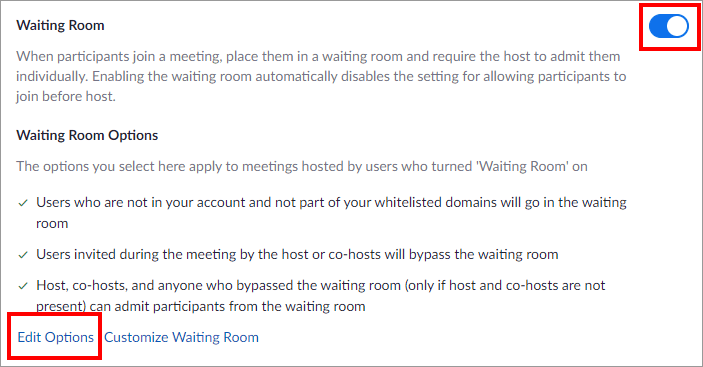
- Click Edit Options and choose: Users who are not in your account and not part of your whitelisted domains
Make sure that *.auckland.zoom.us is added to the whitelisted domains.

- Mute all participants when they join a meeting is on.

- Disable Allow participants to join before host. Participants will be told that the host hasn’t started the meeting yet.

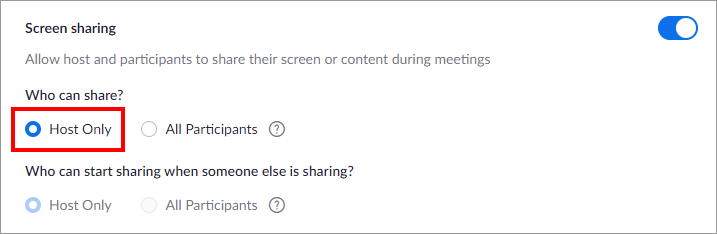
- Screen sharing is set to Host Only. The host can grant screen sharing access to others (if appropriate) during the meeting.
- Send files via meeting chat is disabled.

- Allow removed participants to rejoin is disabled.

Scheduling meetings
If you like to schedule Zoom meetings in advance, we recommend the following settings:
- go to https://auckland.zoom.us/meeting/schedule
- Use an Automatically Generated Meeting ID, rather than a personal Meeting ID. This prevents people gate crashing your meeting if they have followed an old link.

- If you are only expecting staff or students of the University to join the meeting, select Require authentication to join, then select University of Auckland from the dropdown menu.*
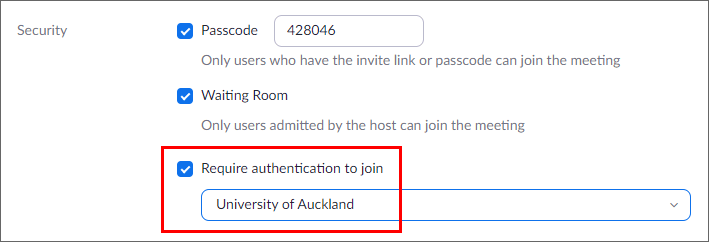
* The Require authentication to join setting is useful for increasing the security of your meeting, requiring staff or students to log in with their University of Auckland account. If you are scheduling lectures, tutorials, lab demonstrations etc., please provide clear login instructions (example below), otherwise they may complain that they cannot connect to the meeting.
Paste the link that Zoom provides into your Canvas Syllabus page or use a Canvas Announcement, e.g.,
Join Zoom Meeting
https://auckland.zoom.us/j/94348750215?pwd=aBCdEfhg
Copy and paste this instruction into your Canvas course:
To join the Zoom meeting you will need to sign in to the Zoom app using your University account:
1. Open the Zoom app
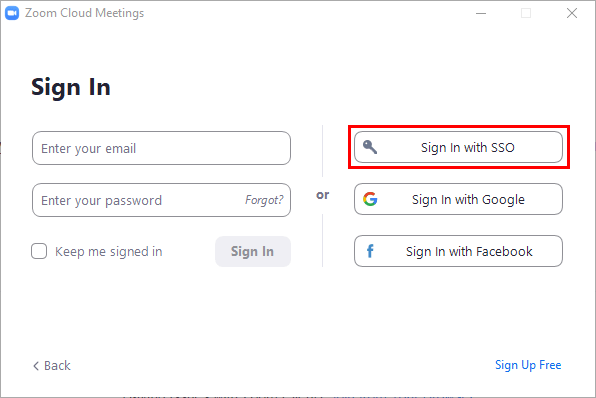
2. If you are not yet signed in, click Sign in with SSO
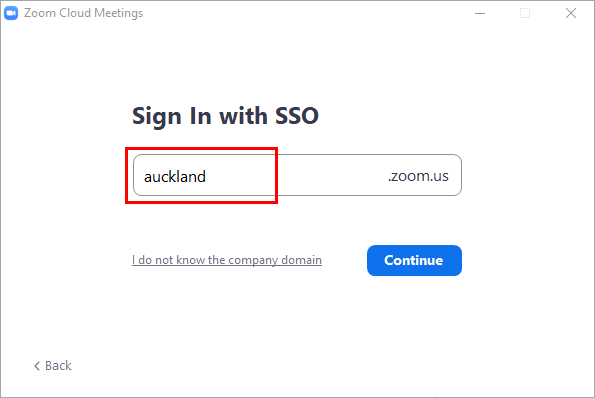
3. For the Domain, type auckland and click Continue
4. Paste the link to the Zoom meeting into your browser and launch the meeting
Avoid Zoom bombing
Zoom bombing is an unwanted person joining your meeting, eavesdropping or causing mischief. Find out what you can do if this occurs.
Guides to using Zoom
- Getting started with Zoom (PDF)
- University branded backgrounds for Zoom and changing your Zoom background
- Watch segments of the Zoom training session for the University of Auckland staff, hosted by Tim Page.
- Recording shared screen and active speaker (e.g., for recording PowerPoint)
- Zoom live training webinars including Zoom meetings for education.
- Record Zoom meetings to the Cloud (includes automated transcripts).
Note: Cloud recording links are only available for 60 days. If you download your recordings from the Cloud, then upload them to Panopto they remain stored for longer. If you integrate Zoom with Panopto, the upload process will be done automatically.
- Zoom recording layouts settings for Active speaker, Gallery and Shared window views.
The recording layout follows the video layout of the participant or host that started the recording. For example, if the host grants permission to a participant to record, and the participant starts a local recording while in active speaker view, the recording layout will be in active speaker view. - Use annotation tools on a shared screen or whiteboard in Zoom.
- Zoom best practices – a simple checklist for making the most of Zoom (Case Western Reserve University).
Uploading Zoom recordings to Panopto
Note: Zoom Cloud recordings are only available for 60 days. Downloading your recordings from the Cloud, then uploading them to Panopto will ensure that they remain stored for longer. Integration with Panopto also allows you to start a Zoom recording that uploads to Panopto automatically.
See instructions for:
- Download a Zoom recording
Note: Staff can access their Zoom Cloud recordings from https://auckland.zoom.us/recording - Upload video to Panopto
- Integrate Zoom with Panopto so it uploads recordings to Panopto automatically.
- Recommended Zoom settings for recording a PowerPoint presentation.
Recording a presentation
See the Frequently Asked Questions section for the recommended settings for recording a presentation.
Schedule a Zoom meeting from Canvas
Teachers can schedule Zoom meetings in a Canvas course via the Zoom tab in course navigation menu. View detailed instructions.
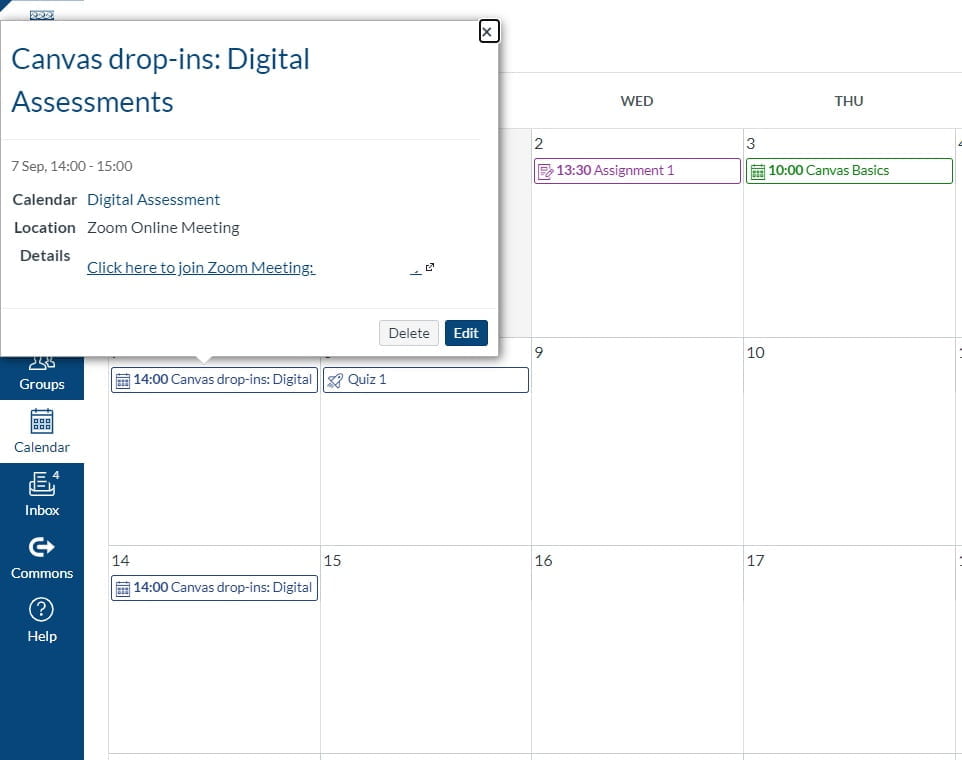
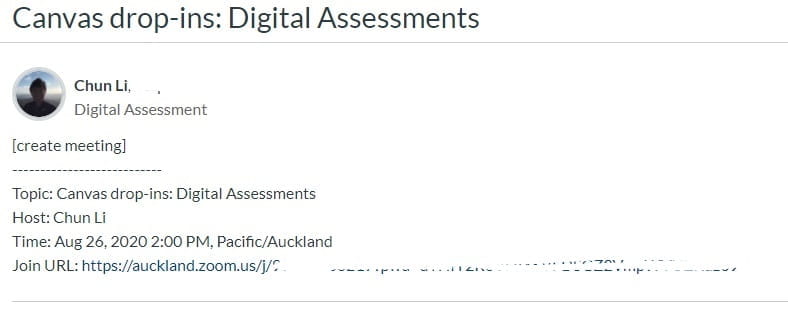
Once a new Zoom meeting is scheduled it will be added to Canvas Calendar. For example, as shown in the screenshot below, “Canvas drop-ins: Digital Assessments” with its Zoom link has been added to every Monday in September. If a user has access to multiple courses, all the Zoom meetings scheduled in those courses are shown in the user’s Canvas Calendar.
A message with Zoom meeting details will be sent to students and staff via Canvas Inbox. A notification email will also be sent to everyone who turned on “Conversation message” in their notification preferences.
All staff in the Canvas course will be added as alternative hosts. Editing alternative hosts is not available in Canvas yet. The Zoom meetings created in Canvas are saved in Zoom web portal, where a meeting host can remove / add alternative hosts.
Tips for scheduling meetings for Canvas groups in Zoom
- Using the Zoom Pro LTI in Canvas to schedule meetings for groups can result in multiple notifications for each session sent to all groups and is therefore not recommended.
- Please remind your students use their University credentials to log in to Zoom. This ensures that they will be included if you set up groups before the session.
Adding Zoom recording transcript into Canvas
Audio transcripts are available for Zoom recordings that are saved to the cloud. See the FAQs section on downloading a transcript from Zoom.
Uploading videos to Panopto auto-generates closed captions and transcripts, and students can search for keywords to quickly jump to the relevant chapter.
Some students may also benefit from Google’s Live Caption feature, whereby captions are provided in Google Chrome browser, whenever they play a video.
FAQs
Students report they are unable to connect to my Zoom meeting
Zoom connection issues are often related to which Zoom account the student has logged into, i.e., the Zoom app may be using their personal account rather than their University account. The following two scenarios describe the best approach for scheduling Zoom meetings that avoids common problems.
Scheduling a Zoom meeting for the class
For this scenario we recommend scheduling Zoom meetings in Canvas. Students will then access them from Canvas.
- Please visit the Canvas Documentation website for instructions for teachers for scheduling Zoom meetings in Canvas.
- Please copy and paste the instructions for students for accessing Zoom meetings in Canvas to your course instructions page.
Scheduling a Zoom meeting for an individual or a small group
For this scenario we recommend scheduling Zoom meetings in Zoom. Students will then access them from Zoom.
If students are unable to connect to your meeting, they may be logged in to the Zoom app with their personal account. Ask them to log out of Zoom and open the Zoom app again. When prompted, students need to select the Sign in with SSO in order to access the meeting.
On the next page, they should type ‘auckland’ as the domain.
This will prompt them to log in with their University credentials.
How do I get audio transcripts from Zoom and add them to Canvas?
“Audio Transcript” is a default setting in the Zoom recording settings (Zoom Pro licensed accounts). An automatic transcript is only created if you record to the Zoom Cloud – choose “record to the Cloud” when you start recording. Transcription takes time to complete and you will receive an email when it is ready.
You can view and edit the transcript online to correct any transcription errors. The Audio Transcript will automatically appear to the side of the Zoom recording, or you can download it as a VTT file format. See Zoom’s article on automatically transcribing Cloud recordings.
If you’d like to share the transcript file on Canvas, open the VTT file in Microsoft Word, save it as a Word or PDF document, then upload that file into Canvas. Here’s how:
Download the transcript file
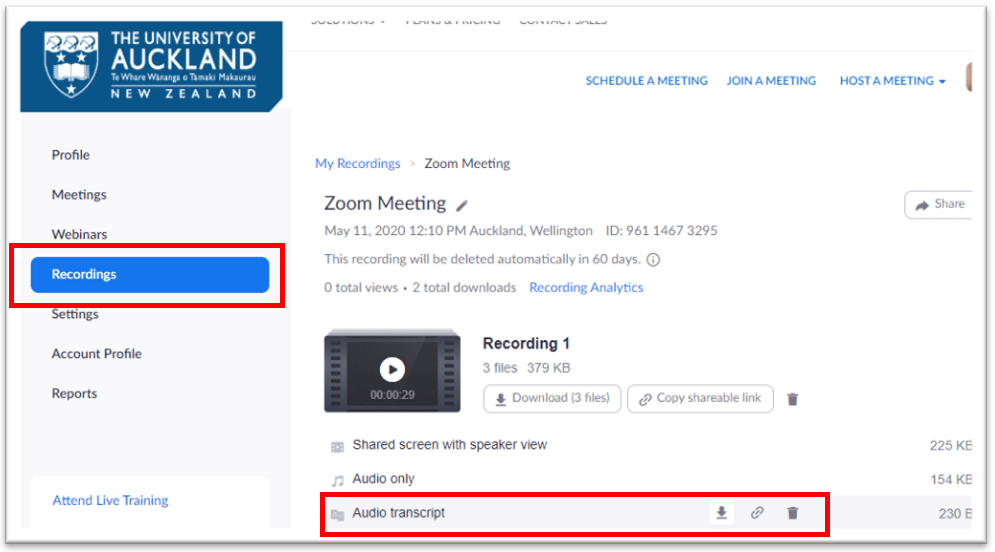
- Go to the Recordings section on the Zoom web portal.
- Click the title of the recording to view its details.
- Hover over Audio transcript and click the download button.
- When prompted, open the VTT file in Microsoft Word and make any edits to mispronunciations. Save it as a Word document or a PDF to your computer.
Share the transcript file
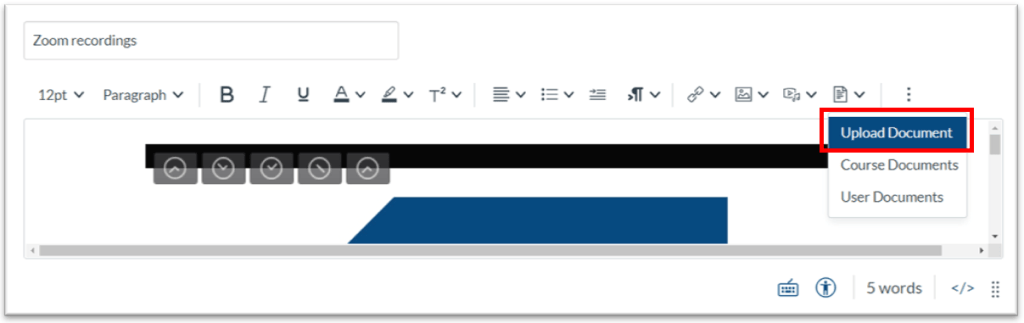
Share the transcript in Canvas by using the Upload Document function and add the link to the transcript next to your video.
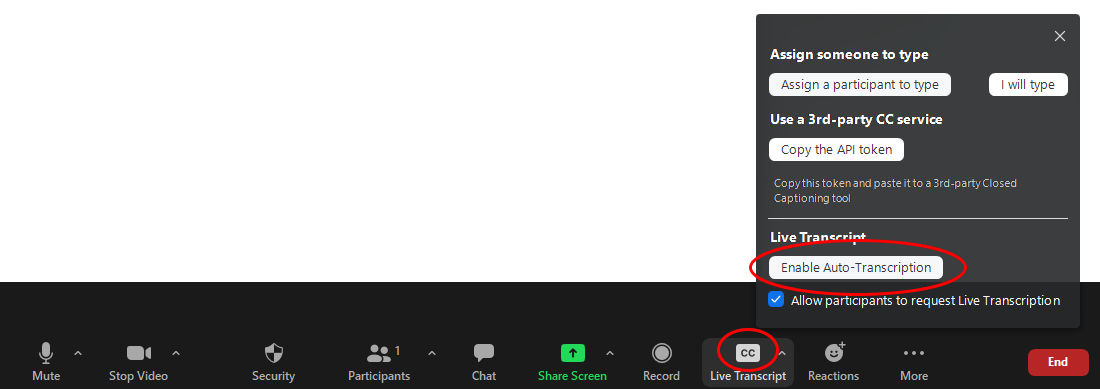
Should I enable live transcript?
In the interests of accessibility, the short answer is yes. However, it should be noted that the live transcript (captions) are created via a text to speech engine; undoubtedly some error will occur. Teachers are required to notify students of this potential, either verbally at the start of each session, or by posting a disclaimer on the course information page.
You may want to copy and paste this disclaimer.
Note: Automatic captions, where used in live or recorded lectures, are generated by computer algorithms and are subject to error. Misrepresentations of the spoken content may occur due to mispronunciations, accents, dialects or background noise.
Live transcriptions can be activated via the Live transcript button on the Zoom toolbar.
Should I live stream my classes via Zoom?
If your students are not disadvantaged by their time zone, nor internet connectivity, live-streaming lectures may be appropriate. However, always provide a recording of the session to mitigate technical issues and for accessibility and decide whether it is appropriate for students to leave their cameras off.
See the page for streaming live lectures.
Can I host virtual office hours using Zoom?
If you wish to host one-to-one virtual office hours, Zoom would be a good option, especially for students within your time zone. If you have a small cohort, you might consider running them as a drop-in session. Otherwise, in order for students to show their commitment, you might ask them to book a session with you in advance. Please be aware that some students will be in different time zones and this would need to be accommodated, as opportunities of this nature should be available all students.
Should I record to the Cloud or my local computer?
We recommend that you record to the Cloud for the following reasons
- A transcript will be created that you can download and add to your Canvas course for accessibility.*
- If the recording stops abruptly (e.g. a computer crash), your recording is more likely to be preserved.
- The recording is shareable with others via a link in your Zoom account (recordings section).
When you stop recording, Zoom will send you a link to the Recording (this may take a few minutes).
Please note that Cloud recordings are only stored for 60 days. We encourage you to download the recording then upload it to Panopto, where it will remain stored indefinitely. If you integrate Zoom with Panopto, this process will be done automatically.
* Share the transcript in Canvas by using the Upload Document function and add the link to the transcript next to your video.
How long will my Zoom recording last for on the Cloud?
The Cloud recordings are available for 60 days. If you download your recording from the Cloud, then upload it to Panopto, it will remain stored indefinitely.* And if you integrate Zoom with Panopto, this process will be done automatically.
* Note: Panopto also adds the copyright information to your video.
How do I access and download Zoom Cloud recordings?
When your recording is ready you will receive an email with a link to the Cloud recording. Sign into your Zoom account to access saved recordings; these are found under the ‘Recordings’ menu in your account. From there you can also download the Zoom Cloud recording to your computer.
What are the recommended Zoom settings for recording a presentation?
We have been asked, “How come the thumbnails of participants are recorded, rather than my PowerPoint slides?”
Zoom records a couple of versions of the ‘video stream’ from your computer:
- The active speaker and shared screen.
- The active speaker and gallery view of participants’ thumbnails.
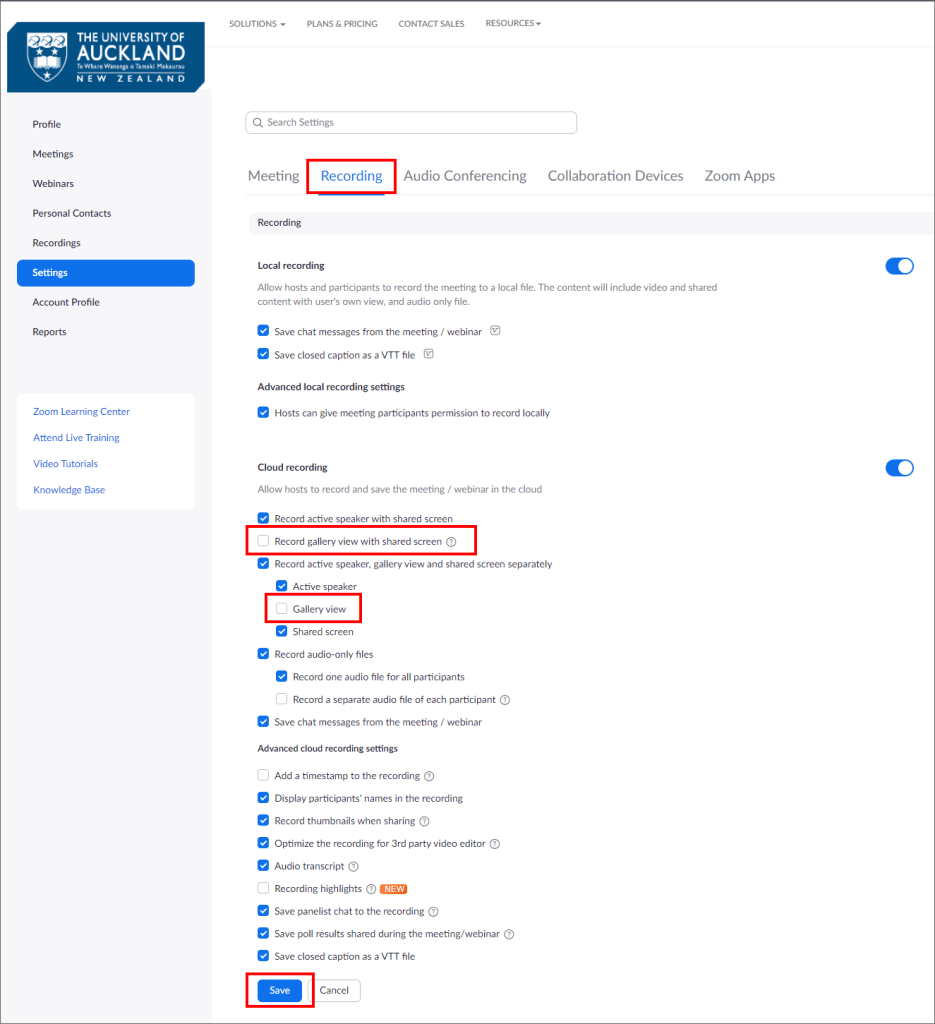
If you have integrated Zoom with Panopto,* you are unable to control which video stream is uploaded to Panopto automatically. In some cases, the version showing the gallery view of participants was uploaded, rather than the version with the PowerPoint slides. To fix the problem, choose which video stream is recorded in the first place, via your Zoom settings.
- Go to your Zoom account: https://auckland.zoom.us/profile/setting
- Click the Recording tab.
- Under Cloud recording, uncheck: Record gallery view with shared screen
- Look for the option called, ‘Record active speaker, gallery view and shared screen separately,’ and uncheck: Gallery view.
- Click Save.
* Note: Integrating Zoom with Panopto automates the process of uploading recordings to Panopto.
See also: UoA branded Start/End slides – PPT, and University branded backgrounds for Zoom and changing your Zoom background.
How do I add my Zoom recording to Canvas?
We recommend uploading Zoom recordings to Panopto, which is available in Canvas courses via the Panopto recordings tab. If you integrate Zoom with Panopto, the upload process will be done automatically.
Alternatively, for short videos, you might consider uploading it to Canvas’ Page Editor. This accepts files of up to 500MB.
Can I use my smartphone as a document camera?
Please see these instructions for setting up your smartphone as a document camera.
See also
Lecture theatre recordings
Tips for using lecture recordings, including LTR- and Zoom-enabled rooms.
Upload video to Panopto
Upload video recordings to Panopto and embed them into Canvas.
Page updated 01/05/2025 (minor edit)