Accessibility practices and tools: Video and audio
Make your multimedia content accessible to all students.
Video and audio can enhance learning, but only when they’re accessible to everyone. Students who are deaf or hard of hearing, have processing difficulties, or use assistive technology such as screen readers rely on captions, transcripts, and clear media structure to engage effectively.
Why it matters
- Captions support learners with hearing impairments, language needs, and varied learning preferences.
- Transcripts allow students to review, search, or skim content quickly.
- Accessible multimedia aligns with the Disability Action Plan, and helps fulfil legal and ethical responsibilities.
Requirements for multimedia
- All videos must include captions—either auto-generated and edited or manually added.
- Audio-only materials must have transcripts that identify speakers and summarise key points.
- Avoid media without captions (e.g., YouTube videos with unverified subtitles).
- Describe visuals if they are not explained in narration or add a brief description in text.
Using Panopto for accessible video
Panopto is the University’s supported video platform and integrates directly with Canvas. It includes:
- Auto-generated captions (editable by staff)
- Downloadable, searchable transcripts
- Keyboard-accessible player controls
- Variable playback speeds and bookmarking
Tips for Panopto
- Review and correct captions for accuracy.
- Add section markers or timestamps to longer videos.
- Use clear video titles and descriptions.
- Keep recordings concise (ideally under 10–15 mins).
For more guidance, see the page on Panopto.
Captioning external content
- YouTube: Only embed videos with accurate, verified captions.
- Zoom recordings: Upload to Panopto for auto-generated captions.
- Podcasts or audio files: Include a written transcript or detailed notes.
Tips for recording accessibly
When recording your presentation:
- Speak clearly and at a moderate pace.
- Don’t discuss unrelated topics while a detailed slide is displayed.
- Verbally describe key visuals or provide a text summary nearby.
- Eliminate background noise or music that competes with speech.
- Provide links (in nearby text) to any resources referenced in the recording.
Common issues and how to fix them
Getting it right
Closed captioning for recordings
If you use Panopto with your Canvas course, Panopto will add captions to recordings automatically. And if you integrate Zoom with Panopto and record to the Zoom Cloud, the recording will upload to Panopto once the session has ended.
- Once Panopto has processed the recorded video, auto-generated captions are created (unless your course has chosen not to enable this feature).
- Check that they are correct—you may need to edit them. Do this by opening the video in the editor and selecting the ‘Captions’ menu.
- If needed, reprocess the English captions to a different language by clicking the ‘import captions’ list and selecting ‘Upload or request captions’.

- Expand the ‘Available Captions’ menu by clicking the ‘English (United Kingdom)’ accordion.
- Click the ‘Change language’ button and select the preferred language from the list.
- Click ‘Save and reprocess’.

Visit the Panopto guide for details on reprocessing captions into various languages.
Live captioning
- In Zoom, enable on-the-fly captions for a live lecture stream (Zoom’s live transcript feature).
- In Panopto, on-the-fly captioning of a live lecture stream (Panopto webcast) is not available.
- Students may also benefit from Google’s Live Caption feature. Captions are provided in Google Chrome browser whenever they play a video (English only).
What about errors in automated-captions?
Understandably, some teachers are nervous about auto-captioning due to the likelihood of transcription errors. However, the University is committed to providing accessible resources for the benefit of all students, not just hearing impaired or neuro diverse students, or English as a second language students. And viewing captions, along with listening, can often help learners retain information. So captions that contain errors can be more of a help than a hindrance.
That said, some courses are not suited to auto-generated captions, e.g., language courses or dialogue that contains a significant amount of te reo Māori.
Where auto-captioning is provided, teachers are required to post a disclaimer, e.g., in the course information page, or where the recording appears in their course content:
Note: Automatic captions, where used in live or recorded lectures, are generated by computer algorithms and are subject to error. Misrepresentations of the spoken content may occur due to mispronunciations, accents, dialects or background noise.
Should you wish to manually correct transcription errors—this is not a requirement of the University—follow the steps to edit closed captions in Panopto.
Transcribing video using Panopto
Panopto’s automatic captions can be downloaded as a text file to provide the basis for your descriptive transcript.
- Upload or locate your video file into Panopto.
- Click the ‘Settings’ cogwheel icon and choose ‘Captions’.
- Expand the ‘Available Captions’ menu by clicking ‘English (United Kingdom)’ or any other language that may have been processed.
- Click ‘Download file’.

- Skip to the ‘Final edits and upload to Canvas’ heading below.
Transcribing video using Zoom
“Audio Transcript” is a default setting in the Zoom recording settings (Zoom Pro licensed accounts). An automatic transcript is only created if you record to the Zoom Cloud—choose “record to the Cloud” when you start recording. Transcription takes time to complete and you will receive an email when it is ready.
You can view and edit the transcript online to correct any transcription errors. The Audio Transcript will automatically appear to the side of the Zoom recording, or you can download it as a VTT file format. See Zoom’s article on automatically transcribing Cloud recordings.
If you’d like to share the transcript file on Canvas, open the VTT file in Microsoft Word, save it as a Word or PDF document, then upload that file into Canvas. Here’s how:
Download the transcript file
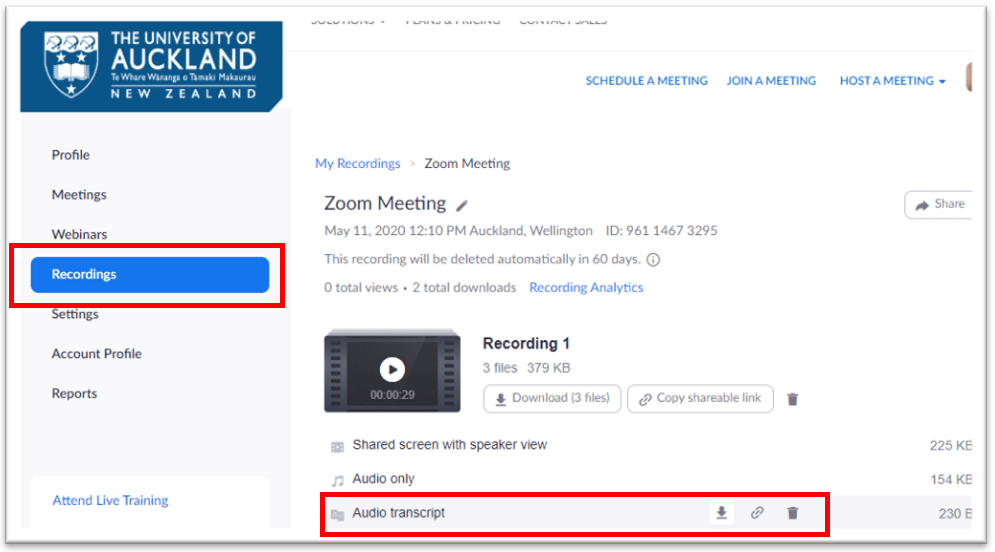
- Go to the Recordings section on the Zoom web portal.
- Click the title of the recording to view its details.
- Hover over Audio transcript and click the download button.
- When prompted, open the VTT file in Microsoft Word and make any edits to mispronunciations. Save it as a Word document or a PDF to your computer.
- Skip to the ‘Final edits and upload to Canvas’ heading below.
Transcribing audio using MS Office 365
MS Office 365 (Microsoft’s Word Online) allows you to record your voice or upload your audio recording via the ‘Transcribe’ feature. You will be able to transcribe up to 300 minutes of audio per month.
- Go to https://www.microsoft365.com
- Click the ‘Apps‘ menu
- Click ‘Word‘
Note: Log in to Word Online using your University of Auckland Microsoft account, e.g. jblo001@uoa.auckland.ac.nz.
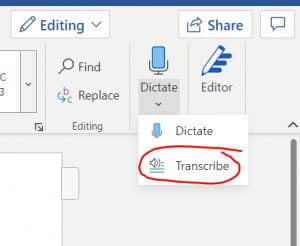
- View the instructions from Microsoft to transcribe your recordings (scroll down to the heading called ‘Upload an audio file’). The transcript will label each paragraph with a placeholder name of who’s speaking, e.g. ‘Speaker 1’. If you don’t require labels (e.g. there is only one voice on the video), follow the steps that describe how delete them by means of the ‘relabel’ feature.
- Click ‘Add all to document‘ then download a PDF copy. In Word Online, click ‘File‘ > ‘Save As‘ > ‘Download as PDF‘.
- Skip to the ‘Final edits and upload to Canvas’ heading below.
Final edits and upload to Canvas
Your transcript may need final edits before it is fully accessible. If there is more than one speaker featured in the video, make sure their names are added to the relevant paragraphs. If you download a captions file and delete timecodes, consider leaving in timecodes that relate to different topics/concepts and name these topics as ‘chapters’. Students can then more easily ‘jump’ to that chapter in the video.
We suggest you upload the transcript file to your Canvas course via the Upload Document function, then insert a link to the document next to the video.
Related Canvas Baseline Practices and Universal Design for Learning
- Canvas Baseline Practices require captioning for all video content.
- Universal Design for Learning encourages multiple modes of content delivery, giving students options for how they access and process information.
Tools
- UDOIT (Canvas) – scans Canvas content for uncaptioned videos or inaccessible embedded media.
- Panopto – provides auto-captioning, transcript export, and editing tools.
- Microsoft Word Online – produces transcripts for in-app voice recordings or uploaded audio files.
Page updated 27/11/2025 (minor edit)